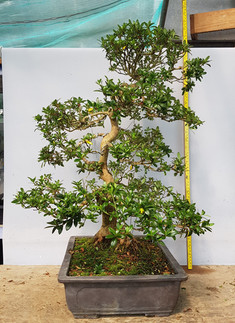
When this Juko satsuki arrived it was already different from the picture I saw when I bought it.
It had lost a major branch about halfway up at the back.(see pictures). That had happened through careless handling while in transit.
This really affected the overall shape of the tree and made it look very top heavy.
Above are the pictures of how it was advertised. You can see through the centre of the tree that there is a large back branch giving depth to the composition.
Below are the pictures of how it arrived and before I did any pruning.
You can see the very large space left by the missing branch. (see arrow).
In effect it was a tree of two halves and the top was now looking far to heavy for the overall design.
The more I looked at it the more it bothered me. However because the tree was new to me I was not sure of its true condition and it did appear to be weaker than I would need it to be for any major work.
It is a big mistake to severely cut back an azalea variety that you are not familiar with or one that does not appear to be very vigorous.
Given the trees condition, I decided to prune it early before most of the flowers had come out. This wouldn't save much energy as the flowers were already formed but it does allow for a slightly longer recovery period if it is needed.
After the trim, I put it in the polytunnel, fed it with a controlled release En-mag fertiliser and waited for it to bud out again. I did end up pruning it a little harder than I was going to.
It seemed to take forever to get going again and I thought I had overdone it with the pruning but after a few weeks it started to show new growth.
After some more consideration and what was looking like a healthy response from the pruning, I decided I would restyle the tree using gentle wiring techniques mainly done through guy wires.
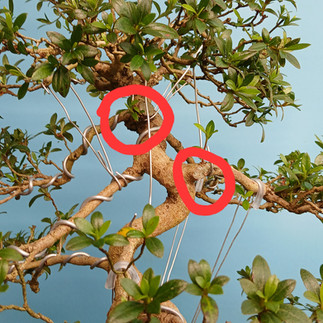
The pictures above show the density of the branches in the apex. The arrows mark the two main problem branches that I think should be removed. Both of them are towards the rear of the apex and are very crowded.
With the decision made to remove the two branches, work could begin. The pruned branches will not be thrown away, but they will provide some cuttings and I shall even try to get the large branch pieces to root.
Below you can see the effect of removing first the branch on the left side of the apex and then the branch from the rear of the apex. The entire feel of the tree was transformed as soon as this was done.
The next process was to screw some steel hooks into the wound sites made where branches had been removed before to tie the guy wires to. This doesn't harm the tree at all and the wounds will heal over. (below)

With the hooks in place it is a simple job of placing and adjusting the guy wires to alter the position of the branches. A few odd bits of traditional wiring and it was done. From now on the shaping will be completed by pruning.
(Front, Back, Left, Right)
(Before and after.)


Opmerkingen